Hpl3:Tools:materialeditor
Contents
Material Editor
The Material Editor helps out in creating new materials to be used in games. It can be run as a standalone app or can be invoked from file inputs in other editors when pressing the '+' button.
Overview
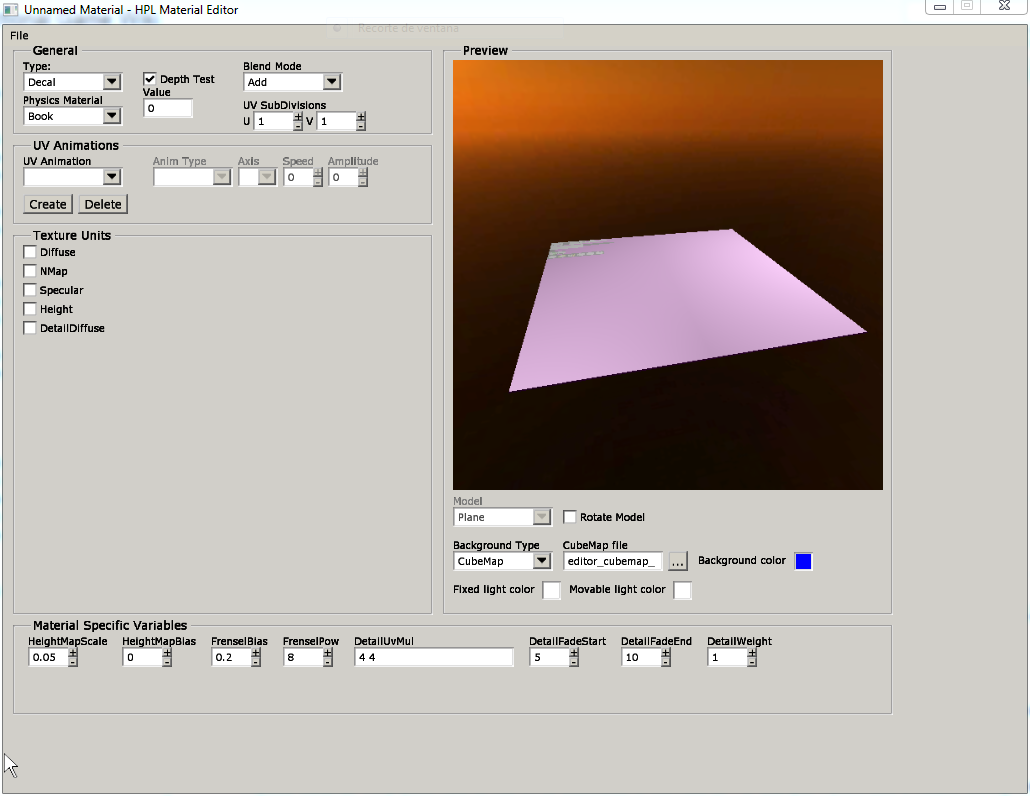
When run, the first screen we get to see is like this:
Each part of the screen has a specific function, as follows:
Main Menu
This is a menu bar, just like in any other windowed application. Available options for this particular editor are as follows:
File
* New: This command will reset the material to an empty one, and the editor to a default state as well.
* Open: This will load a map file in the editor.
* Save: Use this to save your work to a file in disk. Will ask for a file name when no file has been created.
* Save As: This will also save your work, but will ask for a file name everytime it is called.
* Quit: This will exit the program.
General Settings
This group contains inputs to control basic properties for the currently edited material.
Material Type: This combo box will show the available engine material types. Currently these are:
* Decal: set this type when you want to create a material to be used by regular decals.
* ProjectedUV: this material type does a normal projection of textures over objects.
* Soliddifuse: use this for your regular solid objects.
* Terrain: this type applies to the materials you will paint on a terrain.
* Terraindecal: special type of material only to be used by terrain decals.
* Translucent: for non opaque objects.
* Water: to simulate liquid objects.
Depth Test: if the material should be affected by depth test.
Blend mode: blending mode to be used by the material.
Physics Material: the physics material that will be associated to this material. For example, if you create a metallic looking material, it should be logical to associate it to a metal physics material (these being defined in the materials.cfg file located in the redist folder)
UV SubDivisions: this sets up in how many parts the way the material will be split
UV Animation Settings
This group contains controls to add and edit UV texture coordinate animations. Displacements, rotations, etc can be done using these.
UV Animation: currently selected animation. Any edition will be done on this particular one.
Create / Deletebuttons: will add a new animation / remove the currently selected one.
Anim Type: animation type for the current animation. Possible values are:
* Translate: will perform a linear displacement over the texture along the given axis and at the given speed.
* Sin: will add an oscillating movement over the texture along the given axis, with the given amplitude and at the given speed.
* Rotate: will rotate the texture around the selected axis and at the given speed.
Axis / Speed / Amplitude: used to set the parameters used for the previously explained setting.
Texture Units
This group is one vital part of the material edition process. All texture data that is going to be used by the material in the engine will be set here. It is divided in two different parts:
Available Texture Units: here we will see a list of the texture units that this material can use. If you want a material to use a determinate unit, you need to enable it in this list. To do so, just check the box right at the side of it. Each type of material will show its own set of units, see each material type for details.
Texture Unit Panels: here we will see details for every texture unit that we have enabled from the available units listing. Along with a thumbnail, we will have the following inputs:
* File: texture file for the unit. Must be in a valid format (jpg, png, bmp…)
* Wrap Mode: this will set the texture behaviour when the surface it is applied onto has texture coordinates that exceed the 0.0-1.0 range. Available modes are
' Repeat'
' Clamp'
' ClampToEdge'
' ClampToBorder'
* Use Mip Maps: sets if MipMapping should be enabled for the texture.
* Animation Mode: sets if the texture data should be loaded as an animation. A special formatting on file names is required for this to work. Available modes are:
' None': no animation at all.
' Loop': the animation will show over and over, "rewinding" itself everytime the end is reached.
' Oscillate': the animation will play forward and then backwards when the end is reached.
* Frame Time: time in seconds that frames will be displayed.
Preview Window
This window will show a realtime preview of how the material would look ingame. Following there is a description of each control:
Viewport: the actual material showcase. It should show a simple model using the material, a background and two lights. The current point of view can be controlled with the mouse. Left mouse button + movement will orbit the camera around the model, scrolling wheel up and down will zoom in and out respectively. Pressing the right mouse button + movement will move one of the lights around.
Model: this combobox will show a set of preview models that you can select. Currently available there is a Box, a Cylinder, a Sphere and a Plane.
Rotate Model: when checked, the model will rotate around its own Y axis (upward one).
Background Type: use this to select a cubemapped background or a flat colored one.
Cubemap File: background file that will be shown when the cubemap background type is selected.
Background Color: color that will be shown when the flat background type is selected.
Fixed Light Color: diffuse color for the non-movable light.
Movable Light Color: diffuse color for the moveable light.
Material Specific Variables
This group will show controls that are specific to a material type. Descriptions for them should show when moving the mouse over them.
