HPL1/Editors/Particle Editor
HPL1/Content Creation Chapter 6HPL1/Content Creation Chapter 6HPL Particle Editor
1 Introduction
This is the guide for the HPL-Particle editor which is a tool for creating various particle effects. This page is not up-to-date, the particle editor has more features and functions than listed here. Most can be experimented and understood without any documentation, but if you are up for it please update the wiki documentation.
1.1 Min and Max values
A lot of values in the editor have both a min and max. This means that when the value is set to a particle a value between min and max is randomly selected.
1.2 Fading
Fading can be used to fade in and/or out some property like size or colour. The fading works like this. There are three relative values that are relative to the start value of the particle. The names for these values are start, middle and end and are used in that order. There are also two times that are relative to the life of the particle, for example if a particle has 2 seconds life time and the middle time is 0.5 then this occurs after 1 second (0.5 * 2). The first time is called middle time and this is when the start value is entirely faded from start to middle. The middle length is how long the middle value lasts. After middle time + middle length the middle value is faded to the end value.
2 Parameters
2.1. General
Name
The name of the emitter currently selected.
Max Particles
The maximum number of particles that can be alive at once. When this limit is reached no more particles willl be created.
Particles per Second
The number of particles per second that will be created.
Start time offset
Time offset in seconds before the emitter starts.
Respawn dead particles
If dead particles should be respawned.
Warm up time
Time that the emitter gets to warm up. This is useful when doing a a stream of something (like a fire or waterfall) and the particles should not be shown “starting up”.
Pause
A pause is a break during which no particles are created. Particles are updated though.
Pause Length
The length of the pauses, 0 and 0 means that there are no pauses.
Pause Interval
The length between pauses. 0 and 0 means that there are no pauses.
Offset position
How the emitter is offset relative to its starting positon.
Offset angle
How to particle system is offset relative to its start angles.
2.2 Start
Start type
Sets what method to use to generate the start position of the particles in the emitter.
Box start
A box start is created using an x, y and z min and max value. The collection of particles will get the shape of a box.
Sphere start
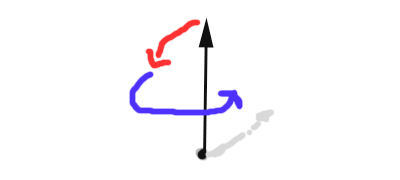
The positions are generated using an angle interval and the min and max value for the radius. You can think of it like this; an arrow start pointing up. This arrow is then rotated around the X axis (red) using a value between min and max. After that the arrow is rotated by the y axis (blue). The arrow will now be pointing in a specific direction and in this direction a position is created at a distance from center according to a number generated from min/max radius.
2.3 Movement
Velocity type
The way in which the starting velocity is generated.
Box velocity
The same as box start but with velocity instead.
Sphere Velocity
The same as sphere start but with velocity instead.
Coord system
The way in which the particles are related to the world and the object the system is attached to (if any). In world all the particles have an individual postion that does change depending on the parent object. In local however the particle position is dependant on the parent object so if that the particle moves and turns along with the parent.
Uses direction
If the direction of the start velocity depends on the way the particle system is “facing” (with no rotation it faces up). This is useful for systems like steam where the system has a direction.
Gravity Type
The type of gravity being applied to the particles.
None: No gravity it applied.
Vector: The gravity acceleration is applied.
Centre: The particles are drawn towards the centre of the particle system with Gravity Acceleration Y as acceleration.
Gravity Acceleration
Used differently according by the gravity type.
Acceleration
Accleration applied to all bodies.
Speed multiplier
How much the speed is multiplied by each second. For example, 0.5 means that the speed halfed each second. 2 means it is doubled each second.
Maximum speed
The maximum speed that the particles can reach.
2.4 Life
Lifespan
Time in seconds that the particle will live.
2.5 Colour
NOTE: all of the colour channels have values from 0 -1.
Color
This sets the colour of the particle.
Fading
Settings for fading the colour. See chapter 1.2 for fading.
2.6 Rendering
Draw Type
The different ways in which the particles can be draw to screen.
Point: The particle is a point and will always be pointing towards the camera.
Line: The particle is aligned in the direction in which the particle is travelling.
Multiply RGB with Alpha
Some materials does not fade out the image when alpha is decreased (for example Additive) in this case it can be good to check this.
Size
The size of the particle. This is the value used in the fading.
Size Fading
See 1.2 for instructions on fading.
2.7 Collision
Use Collision
If collision detection should be used.
Update Rate
How many times a second collision is check for each particle.
Maximum Collisions
The maximum amount of collions can have before dying.
Bounce Amount
How much of the speed is retained when bouncing. 0.5 means half of the speed. 2 means that the speed doubles when bouncing.
2.8 Material
File
The material file to use.
Number of Files
The number of material files used. Normally this should just be one, but in some cases an animation needed is spread out over several material files. When using several material files these must be name “[name]01.mat”, “[name]02.mat”, etc. Also the file text must be just “[name]”. So if the files are called “test01.mat”, “test02.mat”, etc it must say “test” in the file field.
Animation length
The number of seconds the animation lasts, if the particle lives longer than this time, the animation is looped.
Sub Division
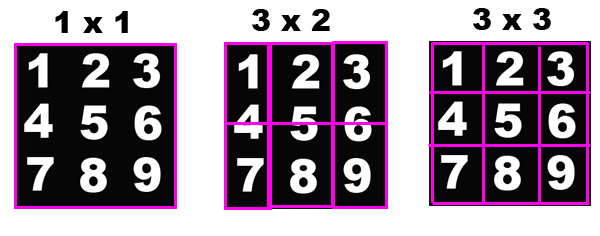
This is used in order to animate individual particles (when using several files, the material for all particles are changed at the same time). It can also be used for more variety among particles. The sub divisoion is set up by specifying how the texture is to be split and then setting how the particles will be assigned to a sub division. The splitting is like this:
Sub Division Amount
The number of divisons on each axis.
Sub Division Type
How the subdivisions are assigned to the particles.
Random: A division is randomly picked.
Animation: During the life time of an object it has all the subdivisions. Starting in the upper left corning and ending in the lower right.