HPL1/Content Creation Chapter 2
Contents
2. Creating Models
2.1 Geometry
IMPORTANT NOTE:
When you want an object to have physics simulated it is very important that it is placed with its mass center as the center of the scene (not the map, the scene in the maya, 3ds, etc file). When you have several objects, when creating joint’s for example, it is important that the pivot of each object is at their mass center (Note that simply changing the pivot point may not be the best option since that changes the transformation, the best thing is to go into vertex mode and move the entire object until the center is where you want it to be). This may also be used to your advantage when creating bodies that would be hard to tip or have the mass center offset for some other reason.
You should always try to center the object to the editor’s scene center!
As of July 2006 the engine automatically calculates the body center if it's a single mesh model. However, it is still recommended that you do the above as a proper work method for the engine.
All geometry must be triangles. This can be made sure by either triangulating or choosing an “export as triangles” option in the exporter.
Currently all types of meshes are supported except for shadow casting meshes where triangles that share the same 3 vertices (or 3 vertices with the exact same coordinates) are forbidden. This means that double sided polygons are not handled on shadow casters for the time being. (For those interested this is due to a limitation in the edge detection algorithm, used when creating shadows, but may be fixed if it is really needed.) Shadow casters does not handle edges with more than 2 triangles as well.
Also note that closed meshes with normals facing away from its center (i.e. a closed room) cannot cast shadows since the shadow will be omnidirectional and will fill the entire screen. This will most likely only apply to scene geometry and the ways to fix it are the following:
- Set the geometry as non shadow casting (see chapter 3.5).
- Create a hole in the geometry (for door, window, etc.).
- Detach some polygons so that the closed geometry is split up into several unclosed geometries.
2.2 Animations
IMPORTANT NOTE 1:
Animated objects do not have any physical simulation. Bodies may collide with them but they will not push other bodies around in a convincing matter and bodies might also get stuck. So use animation with colliders carefully.
IMPORTANT NOTE 2:
When creating the skeleton for an object then the joints can NOT be rotated. You may only use translations for the initial placement. Rotation may be used in animations as normal though.
At the moment the engine can not handle animations with scale!
Currently both skeletal (using skinned bones) and object (just key framing objects) are supported. Objects may not be attached to bones and the two they may not be mixed.
To create models with several animations you need to use entity files (covered in chapter 6). These allow the user to add more files with animation. When doing this there are two types of files:
When using skeletal animations make sure that the skeleton root is at the root of the scene. If not, the engine will not find it.
Main file: This is the file that defines the geometry, material, skinning and so on of the model. This also contains colliders. If the animation is not skeletal then there must be an animation in this file for the engine to determine the data needs. The animation data in the main file is NOT added though!
Animation files: These files should contain exactly the same data as the main file except for colliders.
At the moment the engine cannot load animation data alone since it depends on whether the model is skinned or not and the placement of nodes. So the extra animation files must also contain all other data as the main file. However the animation files should not contain physics data like colliders. These should only be in the main file.
If you want to add colliders to the animation you can do either group them with the object they should move relative to or not group them at all. If not grouped they will be placed relative to the center of the entity (this mean the center of all objects apart of the animation). It is possible to combine these two types.
If you have 2 boxes spinning around each other and want to add colliders to them you simply create two collider objects and place them correctly. Them you select collider 1 and box 1, press group, select collider 2 and box 2 and after that you press group again. Now the colliders will be attached to the boxes.
Since animated objects do not interact physically with other bodies then sometimes you might want to encapsulate the entire animation inside an animation. To do this just create the collider and do not group it with anything (it MUST lie in the scene root, so that it has no parent node).
When you want to change material or perhaps even alter the look of an object this only has to be done in the Main File, as long as the placement (transform) is the same.
Maya specific:
If an animation doesn’t show up correctly try sampling it. In Collada options mark Sample and set the sampling function to the sampling rate, which is the time for each frame you sample. If you want to sample 5 times a second write "0.2" (1/5), for a sample rate 30 times a sec write ".033333" (1/30) and so on.
2.3 UV-Mapping
Since the HPL-Engine uses per pixel lighting and normalmapping extra care has to be used when creating mapping the uv for a model. The best advice is to have as few pieces as possible and to put the seams in hidden or flat surfaces. It is also good if the seems are close to each other on the texture map and if the angle between the edges making the seam is a small as possible.
2.4 Colliders
Colliders are used by the physics system to calculate collisions. Models that don’t have any colliders cannot collide with anything. Unlike static map meshes (see chapter 3) you don’t have to add a “nocollide”-parameter to show that the model doesn’t have any collision, models never have any collision unless it has one or more colliders.
Colliders are made with normal geometry that is named in a special way. The naming has the following syntax:
_collider_[shape type]_[name]
The first variable “shape type” is the type of shape and “name” can be anything you like. The following shapes are available:
| sphere | A normal sphere, nonuniform spheres are not allowed |
| box | A 6 sided box |
| cylinder | A cylinder where height is the Y axis |
| capsule | A cylinder but with rounded caps |
An example of a name is “_collider_box_pCube1”, this defines a box collider.
When creating a shape only rotate, scale and translate should be used (as well as setting the size in Input). If you alter the vertices by hand make sure this pivot is at the mass center, however this untested and might not work very well.
The way in which colliders are added to the scene varies depending on the context. Below is a list of the different types used:
Normal Model
A normal model is a model without joints or skeleton. In this case the colliders are simply added to the scene and they all will become a single body. The centre of mass will be the centre of the scene. The body will be named [entity name] + “_” + [name of model file].
Joint Model
This is a model where one or more joints has been added. This most likely means that the model will consist of several physical bodies This means that it must be shown which body belongs to which body. This is done by grouping the mesh and the bodies in a group. Note that there can only be one mesh per group, if more is wanted these must be children of the first mesh. The centre of mass for each body will be the centre of it’s mesh. The bodies will be named [entity name] + “_” + [name of mesh].
Skeletal Model
If a model contains a skeleton the colliders must be attached to the bones. The bone that a collider belongs to must be its parent, several colliders can share the same bone parent. The centre of mass for each body will be the combined center of all colliders. The bodies will be named [entity name] + “_” + [name of bone parent].
Animated Objects (non skeletal)
The same rules as Joint Model applies.
TIPS:
If you need to have several meshes connected to the same collider. For example, a door with a glass window. This is done by placing one of the meshes as children the to the other. The "top mesh" can have as many children as you like.
2.5 Joints
2.5.1 General
Joints are used to constrain the movement between to bodies. They are a very powerful tool and can be used to do a lot of stuff such as lamps that can sway back and forth, drawers that can be interacted with and even a car with wheels and suspenders.
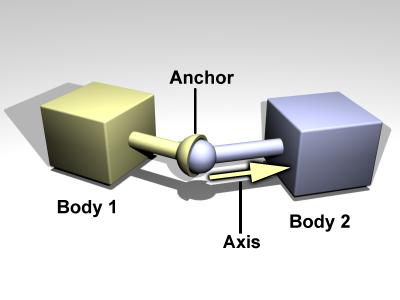
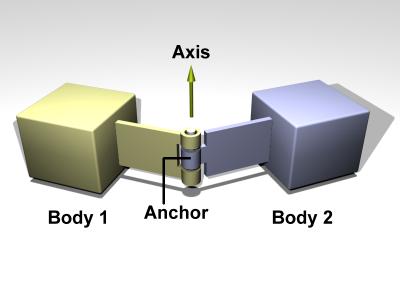
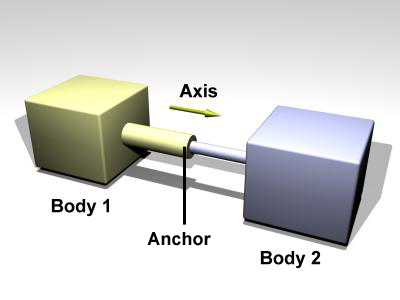
All joints are made up from an anchor (also called pivot point) and an axis (also called pin direction), these have different meanings for the different joint types and describe the constraint. All bodies also have some limits to limit the constraint. If all of these values are set to 0 the limit is disabled. It can also be set if the two bodies on the joint will collide or not.
2.5.2 Joint types
Ball and socket joint
Name in engine: ball
Limits:
Max twist angle, this is the maximum angle that bodies can twist relative to each other. Has a value from 0 – 180.
Max cone angle, this is the maximum angle between Body1 and the axis. Has value from 0 – 180.

This joint is used to model things like rope segments and arm joints
Hinge joint
Name in engine: hinge
Limits:
Maximum and minimum angle between the bodies relative to the start position. Max angle is in the positive direction and min in the negative. To get the positive direction place your thumb on your right hand in the direction of the axis. Now bend your fingers towards your palm, the direction in which you fingers are pointing is the direction of the positive angle. In mathematics this is called the right hand rule. Valid values are 0 – 179.

This joint is used to model things like doors and wheels (picture turning the axis 90 degrees to the left, the bodies will now spin around each other).
Slider joint
Name in engine: slider
Limits:
Maximum and minimum distance. Picture the anchor as attached to Body1. When the anchor is moved in the distance of the axis the distance gets larger and when it moves in the other way it gets negative (and smaller). At the start position the distance is 0.

This joint is used to model things like drawers and pumps.
Note that the slider cannot spin around the axis!
Screw joint
Name in engine: screw
Limits: Same as slider.
This is joint works exactly as the slider but it can spin around the axis.
2.5.3 Modeling
To create a joint (or joints) what you have to do is first to model all the geometry needed to make up the bodies. Each body can only be one object! After that you have to create colliders for the objects, this is done as described as in 2.4. An addition is that you have to set which collider belongs to which body. To do this you have to group the bodies and colliders. The group name doesn’t matter; the important thing is that all colliders and bodies belongs to a group!
Note: In the game world, the bodies will be named [Entity_name] +”_”+[Object Shape name], note that it is the editor’s SHAPE name that is used!
When modeling the different meshes that make up the bodies you cannot use scale directly on the object. You have to go into vertex mode and scale the vertices instead so that the transform is intact with scale (1, 1, 1)!
To create the joint first make a cylinder to represent the joint. A height of 1 and a radius of 0.1 should be fine, it does not really matter as the object is only used for placing the joint. Use a size and ratio you think is easy to work with. The rotation set the direction of the pin and the pivot of the cylinder is the anchor.
2.5.4 Naming
The joints have to be named in a specific way:
_joint_[Type]_[Body1]_[Body2]_[Var1]_[Var2]_ …(properties)… _[Name]
- Type: This is the engine name of the joint (ball, screw, slider or hinge).
- Body1: The name of the first body. Use the name of the object.
- Body2: The name of the second body. If the joint is connected to the world use “null” (without “”) here.
- Var1: Joint dependant.
- Var2: Joint dependant.
- Name: The joint will be named [Entity_name] +”_”+[Name] in the game.
Properties are created just as explained in chapter 3.5. The following parameters exist:
- nocollide This means that the bodies in the joint will not collide.
As stated Var1 and Var2 where joint specific. Here are the details:
Hinge:
Var1: Min angle 0-179.
Var2: Max angle 0-179
Ball:
Var1: Max cone angle 0 – 179,
Var2: Max twist angle 0 – 179.
Slider and Screw:
Var1: The maximum length the child will move in the opposite direction of the axis. 0 – inf in cm!
Var2: The maximum length the child will move in the direction of the axis. 0 – inf in cm!
Some examples:
_joint_hinge_pCube1_pCube2_30_10_nocollide_hinge1
This is a hinge joint that is connected to the objects pCube1 and pCube2. The hinge has a minimum angle of 30 and a maximum of 10. The objects pCube1 and pCube2 will not collide. The joint is named hinge1.
_joint_slider_pCube1_null_slider2
This is a slider joint that is connected to the object pCube1 and the world and the joint is named slider2.
_joint_ball_pCube1_ pCube2_ball2
This is a ball joint without any limits. It is connected to pCube1 and pCube2 and the objects collider with each other and the joint is called ball2.
2.6 Lights
Lights are created exactly as stated in chapter 3.3 with the exception that the dynamic prefix is not allowed.
A light must be attached to a group for it to be animated. The light itself cannot be animated.
If the model has joints or is animated the light must be child to one of the geometries. If not the light should be placed directly under the root (with no parent) node.
The light will be named [entity name]_[lightname] in game.
2.7 Billboards, sound entities, references and particle systems
Created as stated in chapter 3.
The object (billboard, reference, sound or particle system) must be attached to a group for it to be animated. The object itself cannot be animated.
If the model has joints or is animated the object must be child to one of the geometries. If not the object should be placed directly under the root (with no parent) node. This does not apply to references though, which may always be placed in the root.
The light will be named [entity name]_[objectname] in game.
2.8 Optimizations
- When ever you can a model should be one object and one texture! Rendering is more limited by the number of object and texture changes in a scene than the poly count!
2.9 Issues
- Two faces in the same object may not share the same vertices, even if the order is inverted! This means that double sided polygons are not supported!
- An edge may only have one or two faces! If this is not followed shadows will be messed up.
- When creating animated or joint-containing models you must not use the pivot point when exporting. If you have made a pivot point make sure that you clear it so that the model only has one scale, translation and rotation transform in the exported file.
Maya Specific: Do not use the center pivot command when creating these models!
Note that normal models not containing animation or joints may use the pivot point!
\\