Setting up an Online Repository
This article describes the process of setting up an online Git repository, and discusses the workflow.
Contents
Why do I Need a Repository?
The biggest benefit is to combine changes made by all members of the mod team into a single "current" copy. If you're working on a mod by yourself, you probably don't need an online repository. However, an offline one will still give you many other benefits, which online repositories also provide. If you break something, you can easily compare to the previous version (or rollback to it), and easily keep track of exactly what things you've changed since the previous version. Also, if valve update the source code, a repository can make the task of merging the two versions of the code considerably easier.
Terminology
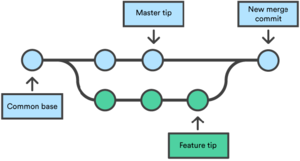
| Commit | A snapshot of the project. Its purpose is to allow to revert unwanted changes and any accidents (such as deleting something). On the graph below, individual dots are commits. |
| Pull | "Download" commits from the branch in the repository. You pull in order to update the project on your end. |
| Push | "Upload" your local commits to the repository. You push in order to update the project on the repository. |
| Repository | The service that stores each commit; it is often used as a substitute for the folder which holds the project. |
| Branch | A separate chain of commits; think of it as making your own version of the project, while others make their own ones. |
| Master Branch | The mutual version of the project; every now and then you (or the project manager) will need to merge your version with the "official" (master) one. This will create a new commit. However, before branches can be merged, you will need to push your changes to the online repository. You should also make it a habit to pull from the master branch before starting any work. |
| Tip | The latest commit in a branch. |
Getting Started
One of the easiest ways to setup an online repository is to use the following services:
- GitLab
- GitKraken
It is necessary to install GitKraken on our local machine and later set up the local and online repository.
Creating the Project on GitLab
- In your dashboard, click the green New project button or use the plus icon in the navigation bar. This opens the New project page.
- On the New project page, choose blank project.
- On the Blank project tab, provide the following information:
- The name of your project in the Project name field. When adding the name, the Project slug will auto populate. The slug is what the GitLab instance will use as the URL path to the project. If you want a different slug, input the project name first, then change the slug after.
- The Project description (optional) field enables you to enter a description for your project’s dashboard, which will help others understand what your project is about. Though it’s not required, it’s a good idea to fill this in.
- Changing the Visibility Level modifies the project’s viewing and access rights for users.
- (Optional) Selecting the Initialize repository with a README option creates a README file so that the Git repository is initialized, has a default branch, and can be cloned.
- Click Create project.
Setting up GitKraken
- Open GitKraken.
- Go to File->Preferences->Authentication.
- Select GitLab and click on Connect to GitLab.
- Approve the connection.
- It is recommended to generate an SSH key and add it to your GitLab account. Here's a guide.
Cloning the Project using GitKraken
- Open a new tab if there isn't one open already, and click on Clone a Repo and then GitLab
- In Where to clone to, navigate to the directory in which you want to place the mod folder at.
- Select the Repository to clone and click on Clone the repo!
- Wait until the files are copied. When it's done, a prompt will show up to open the repo in the app - click on it to open the repository window.
- You can now create branches, commit, pull and push your changes via GItKraken!
HPL Engine-Specifics
When it comes to modding with the HPL engine, the following files should be added to the .gitignore list:
.map_cache.hpm.preload_cache.hpm
