Difference between revisions of "HPL3/Amnesia: Rebirth/Tutorials/Tablets"
(Warning) |
(added a mention about notes) |
||
| Line 1: | Line 1: | ||
This tutorial will detail how to make a custom Dark World tablet. They are the dark-grey tablets that have hieroglyphic text on them which gets translated after a moment. The tutorial assumes you can set up your mod and have basic skills in scripting etc. | This tutorial will detail how to make a custom Dark World tablet. They are the dark-grey tablets that have hieroglyphic text on them which gets translated after a moment. The tutorial assumes you can set up your mod and have basic skills in scripting etc. | ||
| + | |||
| + | If you are already familiar with [[HPL3/Amnesia: Rebirth/Tutorials/Notes|how the readables system works]], the way the tablets work will be largely familiar to you. The tablets only require a few simple steps more than e.g. a note, but this tutorial will cover their creation from scratch. | ||
==Tutorial== | ==Tutorial== | ||
Latest revision as of 18:51, 10 November 2020
This tutorial will detail how to make a custom Dark World tablet. They are the dark-grey tablets that have hieroglyphic text on them which gets translated after a moment. The tutorial assumes you can set up your mod and have basic skills in scripting etc.
If you are already familiar with how the readables system works, the way the tablets work will be largely familiar to you. The tablets only require a few simple steps more than e.g. a note, but this tutorial will cover their creation from scratch.
Tutorial
To get a custom readable tablet in Rebirth:
- In
readables.cfg:- Set up a new category for your map.
- Create a new entry. Set the note ID and FrontEntry to whatever you want. They don't have to be the same, although that's what FG usually did.
- In
english.lang:- Place a category in with the same name as the category ID from
readables.cfg - In that category, set up an entry with the same name as the FrontEntry name previously set for the tablet in
readables.cfg - Add an entry called
<FrontEntry Name>_En. This is the blue text that will appear on the tablet itself (you probably want to set the same text as previously). - Add an entry called
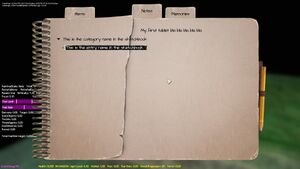
<FrontEntry Name>_Name. This is the name of the entry in the sketchbook. - Add a category called "Levels" and inside add an entry which is called the same as the "Name" parameter in the
readables.cfgcategory. This will be the sketchbook category.
- Place a category in with the same name as the category ID from
- In your map:
- Place the
dw_tablet_readable.ententity somewhere in a level - Set the Readable/ID parameter of the entity to the ID from
readables.cfg - Set the GUI func to
OnGuiDWNoteand set text scale as wanted
- Place the
- In the map script:
- Add this to your include list in your map script:
#include "helpers/custom/helper_props_custom.hps" - Place this function somewhere in your script:
- Add this to your include list in your map script:
void OnGuiDWNote(const tString&in asEntityName, float afTimeStep)
{
    DWNote_RenderGUI(asEntityName, afTimeStep);
}
If you want to make a tablet unreadable (orange gibberish), leave the Readable/ID parameter of the tablet empty. This means that it doesn't need lang and readables entries.
Good practices:
- Name your tablet in game as
Readable_<ID HERE> - If the tablet isn't going to be readable, name the entity like this:
Readable_DWNote_MiscXX, where XX are numbers
Config file examples
English.lang:
<LANGUAGE>
  <CATEGORY Name="sample_map">
		<Entry Name="TestTablet_FrontEntry">My first tablet bla bla bla bla bla</Entry>
		<Entry Name="TestTablet_FrontEntry_Name">This is the entry name in the sketchbook</Entry>
        <Entry Name="TestTablet_FrontEntry_En">This is what will appear on the tablet in blue text</Entry>
  </CATEGORY>

   <CATEGORY Name="Levels">
		<Entry Name="sample_map_sketchbook_category">This is the category name in the sketchbook</Entry>
  </CATEGORY>

</LANGUAGE>
Readables.cfg:
<Readables>
	<Categories>

		<Category ID="sample_map" Name="sample_map_sketchbook_category">
			<Notes>
				<Note ID="TestTablet" VoiceSubject="" FrontEntry="TestTablet_FrontEntry" BackEntry="" ImageEntry="" />
			</Notes>
		</Category>

	</Categories>
</Readables>
