Difference between revisions of "Autodesk Maya"
(Upload from wiki) |
m (Mudbill moved page Hpl2:Third party tools:3d:maya to Autodesk Maya without leaving a redirect) |
(No difference)
| |
Latest revision as of 21:42, 3 August 2020
Contents
Autodesk Maya
Maya] is a professional and comprehensive 3D modeling and animation software. With the use of the OpenCOLLADA plugin, Maya can export a DAE file with the settings required to run in HPL2. They offer a free 3-year [student trial for you to play around with.
Setup
To begin, make sure you have installed a version of Maya that is compatible with OpenCOLLADA. For a long time, the latest version was Maya 2011. Maya 2011 has since been removed from Autodesk's websites (likely due to age), however OpenCOLLADA has also been updated to support Maya 2012 and Maya 2013. There seem to be some progress for supporting Maya 2014 and 2015 as well. ('As of 24. Oct 2014)
You can download OpenCOLLADA here, and install it following the instructions.
Once you have installed the plugin, you must enable it. Open Maya and go to Window > Settings/Preferences > Plug-in Manager. Find OpenCOLLADA or COLLADAMaya or similar, then check the box "Loaded" and "Auto Load" to enable it. This will now give you the Collada exporter option when you save your model.
How to export your model
Once you've made a model in Maya, you can export it using File > Export All (Or Export Selection if you don't want all the objects). There are a few things you must prepare first.
- Your model must have assigned at least 1 material. By default, a new object has a lambert material pre-applied. If you need to assign a new or existing one, hold right click over your model and select Assign Favorite Material or Assign New Material > Lambert. You can also Assign Existing Material.
- Open your material in the Channel Box and click on Color to open the Material Type window. Select the type File and then click the folder icon to open a browser for a texture file. The material requires a texture file. The preferred texture format is DDS (DirectDraw Surface) that can be exported through Photoshop ([1]]), Gimp ([2]) or [Paint.NET.
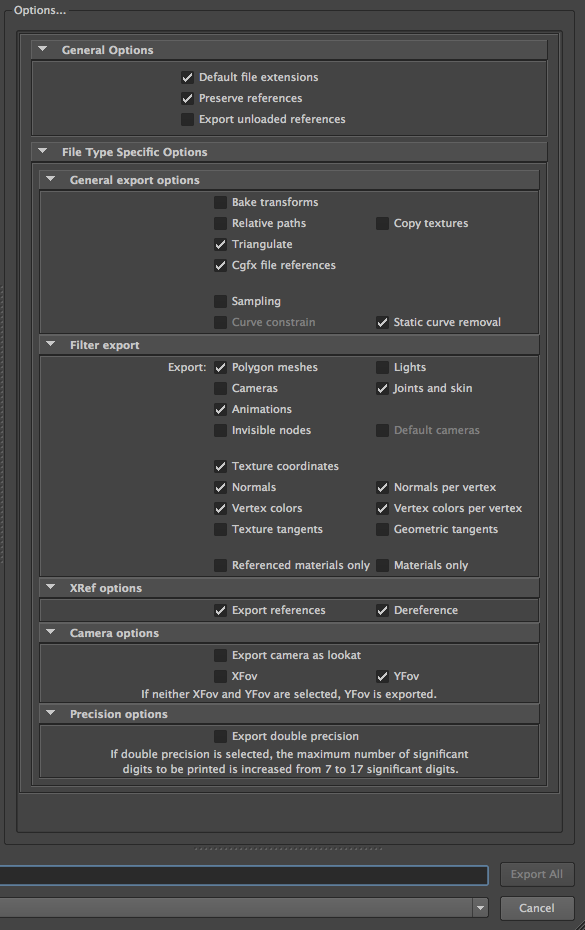
- Once you have added this, you can export your model. Open the export window, then select the OpenCOLLADA or COLLADAMaya exporter at the bottom. Use the following export settings:
Select Triangulate under General Export Options.
Deselect Cameras and Lights under Filter Export
The rest might already be set to the proper value. Compare with this image (from Maya 2011):
Additional information about the above steps
The above is intended to quickly give a sure step by step process to successfully export an object and get it to display within the game engine. It is not intended to be a lengthy tutorial or be suited for advanced, novice or any specific type of user. It's just a quick how to.
Important information on images
Textures(.dds, .jpg. tga and other general image formats) and material files(.mat, the engine specific file) - The material file is an XML file that contains information on what images is used in the material to create the texture and other properties. When the game loads a 3D model it searches for the name of the image used as a texture for the model(the .dds etc) and then replaces that name with the extension .mat to know what material file to use. Because of this it is important that the texture used has the same name as the material file, with the exception of the extension.
