Difference between revisions of "HPL1/Third party tools/Adobe Photoshop"
(Upload from wiki) |
m (Added note about refactoring) |
||
| (2 intermediate revisions by the same user not shown) | |||
| Line 1: | Line 1: | ||
| − | = Adobe Photoshop = | + | {{ConstructionNotice|This page will be merged with [[Adobe Photoshop]] and will eventually be deleted.}} |
| + | |||
| + | =Adobe Photoshop= | ||
[https://www.adobe.com/products/photoshop.html Adobe Photoshop] is a professional image editing software. It can be used to manipulate real-life photographs, draw and design textures, setup background and artwork and much more. It's an extremely useful tool for working with game graphics. Photoshop is available for both Windows and Macintosh. | [https://www.adobe.com/products/photoshop.html Adobe Photoshop] is a professional image editing software. It can be used to manipulate real-life photographs, draw and design textures, setup background and artwork and much more. It's an extremely useful tool for working with game graphics. Photoshop is available for both Windows and Macintosh. | ||
| − | == Introduction == | + | ==Introduction== |
Adobe Photoshop CS for Windows was used during Penumbra's development but has since been deprecated due to it's old release (2003).<br />There are of course alternatives to Photoshop, for example GIMP (multiplatform) and Paint.NET (Windows only). | Adobe Photoshop CS for Windows was used during Penumbra's development but has since been deprecated due to it's old release (2003).<br />There are of course alternatives to Photoshop, for example GIMP (multiplatform) and Paint.NET (Windows only). | ||
| Line 9: | Line 11: | ||
If you're an archivist like me, then you might have a legitimate copy of Photoshop laying around as well - modern versions of Photoshop ''might'' work, but for documentation purposes I will be using Adobe Photoshop CS (2003). | If you're an archivist like me, then you might have a legitimate copy of Photoshop laying around as well - modern versions of Photoshop ''might'' work, but for documentation purposes I will be using Adobe Photoshop CS (2003). | ||
| − | == Setup == | + | ==Setup== |
First off, you gotta install the [https://developer.nvidia.com/nvidia-texture-tools-adobe-photoshop Nvidia Photoshop tools] from the official Nvidia website. | First off, you gotta install the [https://developer.nvidia.com/nvidia-texture-tools-adobe-photoshop Nvidia Photoshop tools] from the official Nvidia website. | ||
| − | == How to == | + | ==How to== |
| − | |||
| − | |||
| − | |||
| − | [ | + | *Once that's done, create a simple image or pick a random image from the internet - for example a crate texture. |
| + | *Here's an example of what you normally see in Photoshop, not the prettiest picture but it'll do. | ||
| + | *[[File:Photoshop image1.png|none|thumb]] | ||
| + | *Images can be saved in formats such as '''PNG''', '''JPG''' and '''TGA''' - all of which the HPL1 engine supports. | ||
| + | *The HPL1 engine does <u>NOT</u> take too kindly to '''DDS''' (DirectDraw Surface) formats, so don't use those. | ||
| + | *Once you've created an image you like, head on over to Filter > NVIDIA Tools > NormalMapFilter | ||
| − | + | [[File:Photoshop image2.png|none|thumb]] | |
| − | |||
| − | |||
| − | |||
| − | Here you can choose a variety of settings that'll make your texture stand out more and look good, I will be saving the bump map for this texture as a 32 bit Targa since the alpha channel can be used later on. You can also preview your texture by clicking the little '''3D Preview''' button. (Pretty cool huh?) <br />You can read a more detailed explanation on how these things work [[ | + | Here you can choose a variety of settings that'll make your texture stand out more and look good, I will be saving the bump map for this texture as a 32 bit Targa since the alpha channel can be used later on. You can also preview your texture by clicking the little '''3D Preview''' button. (Pretty cool huh?) <br />You can read a more detailed explanation on how these things work [[HPL1/Tutorials/Materials|here]], this was just a brief tutorial on how to use Photoshop with the HPL1 engine. |
| − | == Important information on images == | + | ==Important information on images== |
The material file (.mat) is an XML file that contains information on what images is used in the material to create the texture and other properties. Unlike it's successors, the HPL1 engine does NOT generate material files automatically. Instead you will have to create them manually by using the HplHelper program. | The material file (.mat) is an XML file that contains information on what images is used in the material to create the texture and other properties. Unlike it's successors, the HPL1 engine does NOT generate material files automatically. Instead you will have to create them manually by using the HplHelper program. | ||
You can download the tools [https://fricpub.s3.amazonaws.com/tools/hpl1/mod_tools.zip here] if you haven't already. | You can download the tools [https://fricpub.s3.amazonaws.com/tools/hpl1/mod_tools.zip here] if you haven't already. | ||
Latest revision as of 21:51, 3 August 2020
| This page will be merged with Adobe Photoshop and will eventually be deleted. |
Contents
Adobe Photoshop
Adobe Photoshop is a professional image editing software. It can be used to manipulate real-life photographs, draw and design textures, setup background and artwork and much more. It's an extremely useful tool for working with game graphics. Photoshop is available for both Windows and Macintosh.
Introduction
Adobe Photoshop CS for Windows was used during Penumbra's development but has since been deprecated due to it's old release (2003).
There are of course alternatives to Photoshop, for example GIMP (multiplatform) and Paint.NET (Windows only).
If you're an archivist like me, then you might have a legitimate copy of Photoshop laying around as well - modern versions of Photoshop might work, but for documentation purposes I will be using Adobe Photoshop CS (2003).
Setup
First off, you gotta install the Nvidia Photoshop tools from the official Nvidia website.
How to
- Once that's done, create a simple image or pick a random image from the internet - for example a crate texture.
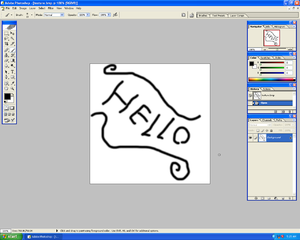
- Here's an example of what you normally see in Photoshop, not the prettiest picture but it'll do.
- Images can be saved in formats such as PNG, JPG and TGA - all of which the HPL1 engine supports.
- The HPL1 engine does NOT take too kindly to DDS (DirectDraw Surface) formats, so don't use those.
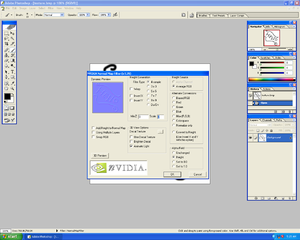
- Once you've created an image you like, head on over to Filter > NVIDIA Tools > NormalMapFilter
Here you can choose a variety of settings that'll make your texture stand out more and look good, I will be saving the bump map for this texture as a 32 bit Targa since the alpha channel can be used later on. You can also preview your texture by clicking the little 3D Preview button. (Pretty cool huh?)
You can read a more detailed explanation on how these things work here, this was just a brief tutorial on how to use Photoshop with the HPL1 engine.
Important information on images
The material file (.mat) is an XML file that contains information on what images is used in the material to create the texture and other properties. Unlike it's successors, the HPL1 engine does NOT generate material files automatically. Instead you will have to create them manually by using the HplHelper program.
You can download the tools here if you haven't already.

